logo

AppSys Plugin

FOR RENTMAN

Manual

Getting started

Register your account

You need an account to be able to use the plugin.
If you don't have an account yet, you can register here.
Every new account gets a 30 day trial period.

Installation

  • First download the plugin as a zip file.
  • Then in your wp-admin, navigate to 'Plugins' -> 'Add New'.
  • Next, click on the button labeled 'Upload Plugin' at the top of the screen.
  • Then choose your zip file and click 'Install now'.
  • After the plugin is installed, click on 'Activate Plugin'.
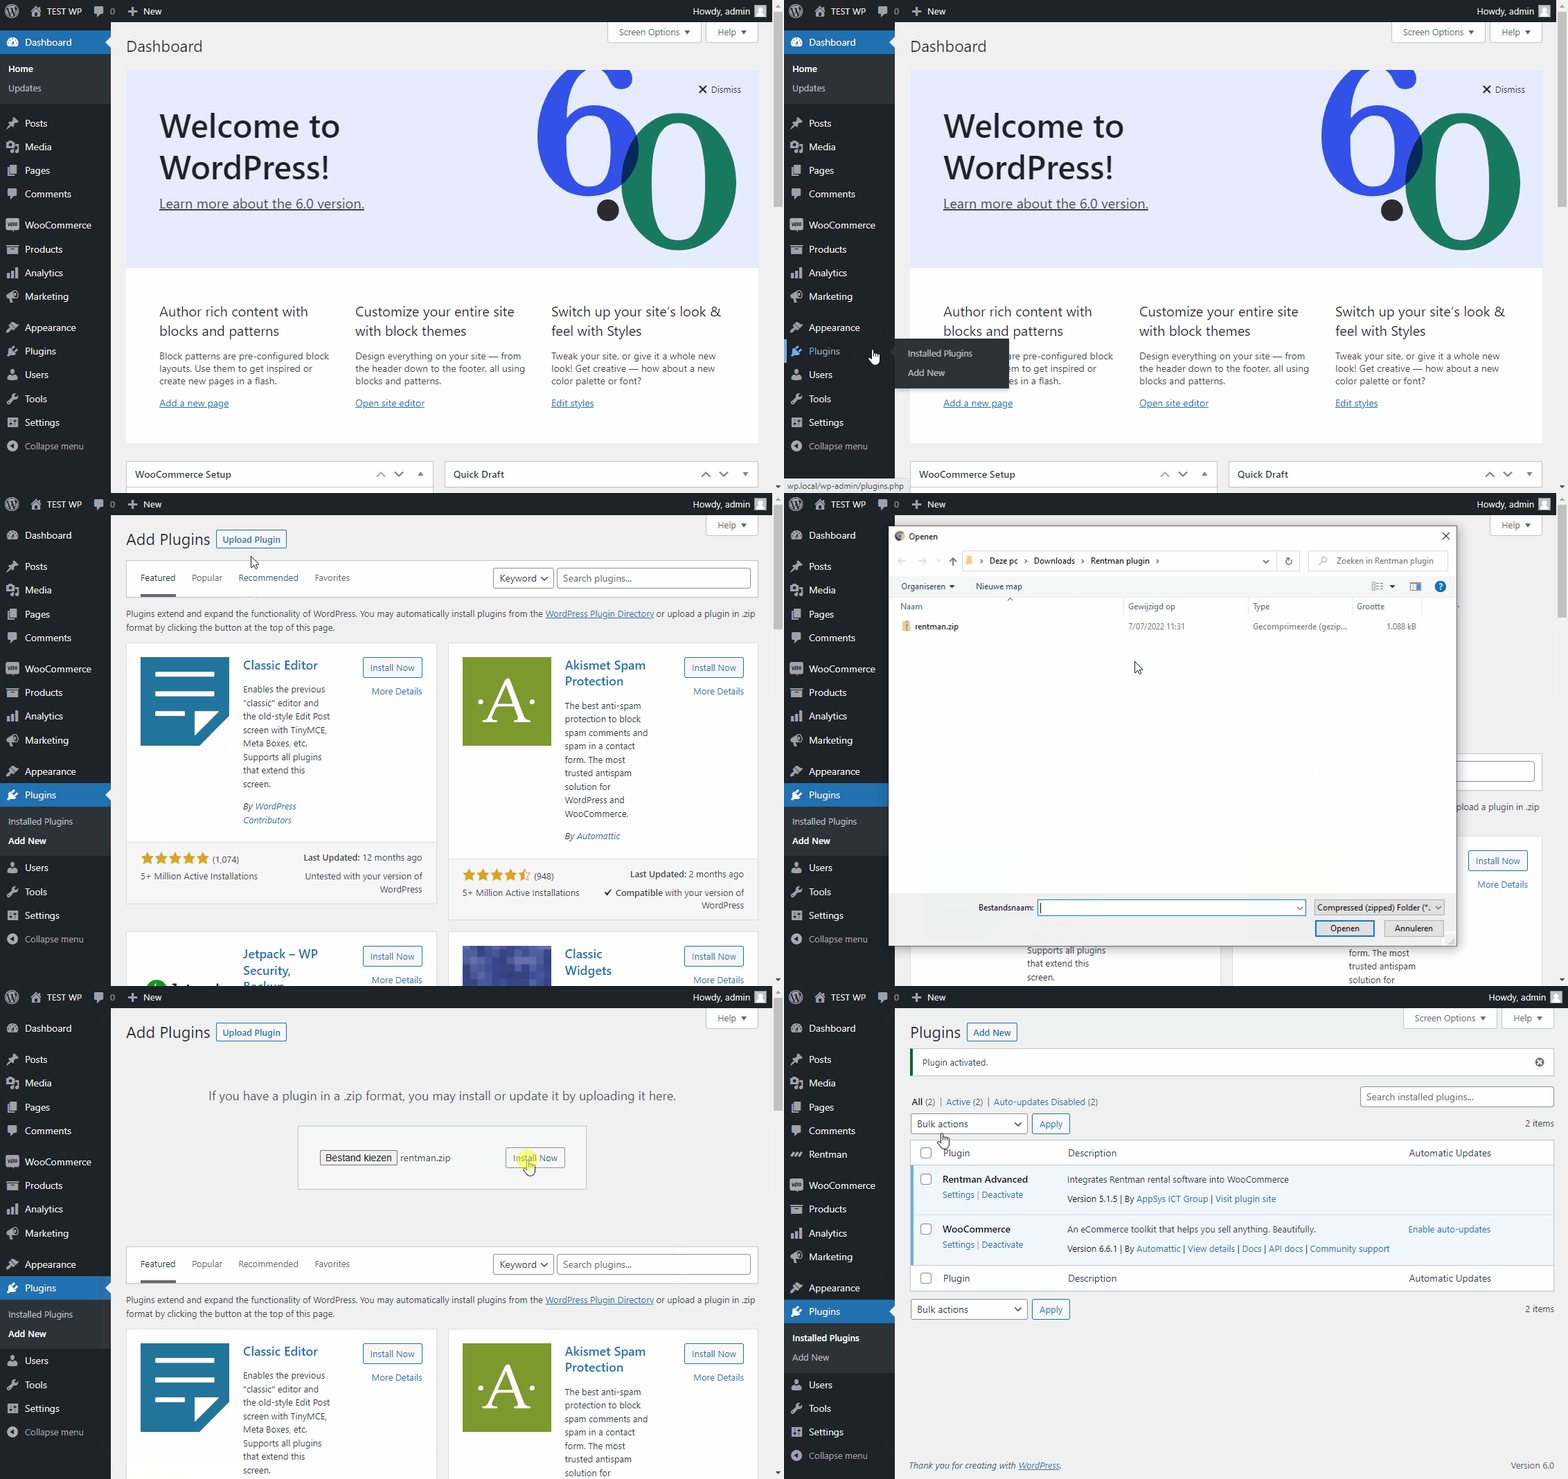
Installation

Configuration

  • To link your Rentman account, you need to fill in a special token.
  • You can find this token in your Rentman application under 'Configuration' -> 'Extensions' -> 'Webshop'. Click on 'show token' and copy the token.
  • Then in your wp-admin, navigate to 'Rentman' -> 'Account', and paste the token. Then click 'Save settings'.
Filling in the token

Once your Rentman account is linked, you can change the plugin settings.

Settings

Show regular price next to discount price

Enabling this option will show the regular price of a product crossed out next to the discounted price
Regular price disabled
"Show regular price next to discount price" disabled
Regular price enabled
"Show regular price next to discount price" enabled

Show availability

Enabling this option will show the availability of a product for the chosen rental period on the product detail page and the cart page.
Show availability disabled
"Show availability" disabled
Show availability enabled
"Show availability" enabled
Show availability disabled
"Show availability" disabled
Show availability enabled
"Show availability" enabled

Block checkout when products are unavailable

Enabling this option will show an error notice on the cart page when one or more products are not available. The checkout page will be blocked, preventing the customer from completing the order.
Error on cart page
Error notice on cart page
Checkout blocked
Checkout page is blocked

Show rental period on product page

Enabling this option will show a datepicker for the rental period on the product detail page.
Rental period disabled
"Show rental period on product page" disabled
Rental period enabled
"Show rental period on product page" enabled

Import images

Disable this option if you don't want to import the product images.

Import files

Disable this option if you don't want to import the product files.

Import accessories as cross sells

Enabling this option will define the products that are accessories in Rentman as cross sells in WooCommerce.

Import alternatives as upsells

Enabling this option will define the products that are alternatives in Rentman as upsells in WooCommerce.

Custom fields

If you have defined 'Extra input fields' in Rentman for your products, they will be imported as product metadata.

Import folders as categories

Disable this option if you want to manage your own categories in WooCommerce.

Import products from

You can specify the folders you want to import. Only the products in those folders will be imported. To select multiple folders, hold down the CTRL key when clicking. This is useful if you use the plugin on multiple websites with the same Rentman account.

Language used for export

Choose your preferred language. This will show all available languages from the Rentman app.

Clients folder

Select the folder in your Rentman app where you want the plugin to store new clients.

Locations folder

Select the folder in your Rentman app where you want the plugin to store new locations. This option only shows if you have shipping enabled in WooCommerce.

Project type

When an order is exported as a project, it will be of this project type.

Project status

When an order is exported as a project, it will have this project status.

Project name

When an order is exported as a project, it will have this project name.

Project color

When an order is exported as a project, it will have this project color.

Project account manager

When an order is exported as a project, it will have this project account manager.

Project usage period start/end time

You can change these values if you want to change the start & end time of the usage period of a project. Since the plugin sets the planning period equal to the usage period, this setting will also affect the planning period start & end time.

Project equipment group name

Change this if you want to have a name for your equipment group. Default is empty.

Importing

  • In your wp-admin, navigate to 'Rentman' -> 'Import', and click 'Start import'.
  • You can leave the page while the import is running.
  • When you modify a product in Rentman, you will need to run the import process again to update the products.
Configuration

Troubleshooting

My products are not imported

You must specify in your Rentman app which products are imported into the webshop.
Edit your product.
In the tab 'Webshop' set 'In webshop' to 'Yes'.
Save your product.
Run the import again.

My product images are not imported

You must specify in your Rentman app which product images are imported into the webshop.
Edit your product.
In the tab 'Data' scroll to the bottom of the page.
Click on the 'FILES' tab to see all your files of this product.
Click on the button with the 3 dots behind the filename, and click edit.
Set 'Display in webshop' to 'Yes'.
Click 'Save'.
Save your product.
Run the import again.